


Next: Checking the quality of
Up: Classification of Images
Previous: Classification of images
We have defined a set of rules for classifying SUSI exposures according to
the exposure type (BIAS, FF, SCI) and a set of rules for classifying them
according to the optical path. (In this case, this consists
simply in classifying the frames according to the filter number that was used.)
The MIDAS session shown in Table 15.5
creates these rules and applies them to our set
of SUSI exposures (Table 15.3).
The result of the classification process is illustrated in Table 15.6.
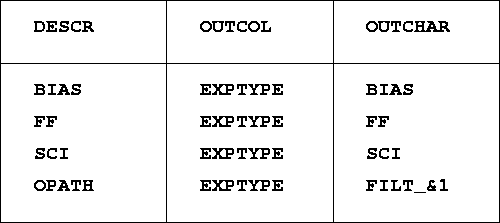
For convenience, one may also store all the classification parameters in a table (Table 15.7) and apply a set of classification rules in one step.
Note that instead of the interactive command CREATE/CRULE the equivalent
command WRITE/DESCR may be used.
The table must
contain the following columns:
- :DESCR - character column
Contains the names of the classification rules descriptors
- :OUTCOL - character column
Contains the label of the output column of the OST in which
the string flagging the exposures satisfying the corresponding rule should be
stored.
- :OUTCHAR - character column
Contains the character string for flagging the rows satisfying
the corresponding rule.
In the session mentioned above, one can replace the four calls to the command
CLASSIFY/IMAGE by:
CLASSIFY/IMAGE susi_ost susi_rule.tbl
Table:
Observation Summary Table with file classifications appended in column :EXPTYPE and :OPATH as defined and applied in Table 15.5
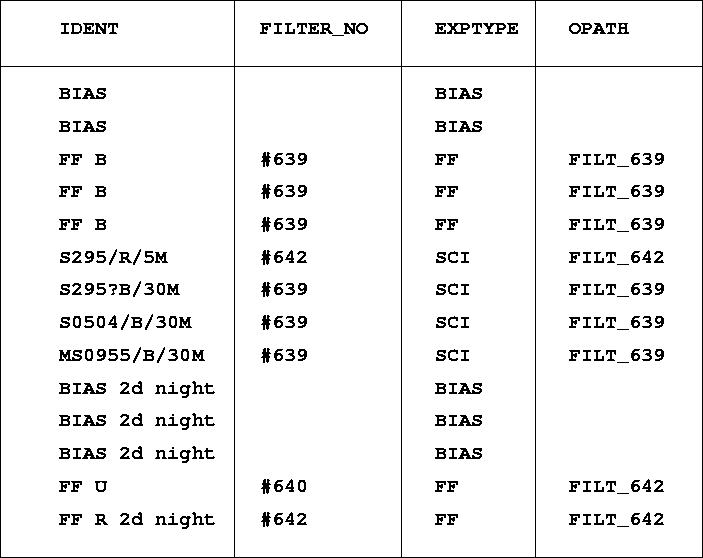 |
Table 15.7:
Classification Table for SUSI exposures (susi_rule.tbl)
 |
Next: Checking the quality of
Up: Classification of Images
Previous: Classification of images
Petra Nass
1999-06-15