After having organised your data set in the CCD association table using the MIDAS Data Organizer you can start to prepare the reduction by creating the CCD reduction table, containing a selection of the science frames and the names of the master calibration frames. This can be done using the command MKREDT/CCD. It will create the CCD reduction table which will contain a single row for each of the selected data sets in the association table. Each row in the reduction table itself contains two columns with the names of the input and output science frames, and a number of columns with the default names of the master calibration frames.
MKREDT/CCD will only create ``calibration columns'' present
in the association table and which have standard column names.
MKREDT/CCD will check the association table for non-standard
names and will give a warning in case these are found. If so, you should
examine the column names in the association table. An example of the
content of the reduction table given in Table ![]() created from the association table in Table
created from the association table in Table ![]() .
.
*** NOTE ***
Although the MIDAS Data Organizer Context (DO) leaves the user free in defining column names in the association table, the CCD context uses a fixed set of standard columns names in the reduction table for identifying the different exposure types. These names are: BS for bias frames, DK for dark frames, FF for flat frames, SKY for sky frames, IL for illumination frames, and FR for fringe frames.
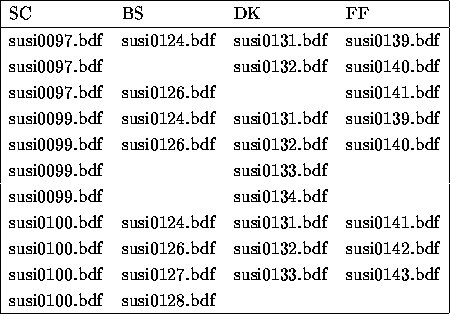
Table: Example of an association table
In the example CCD reduction table the first two lines contains
raw science frames (in columns SC and SC_OUT) are followed by columns
containing the default names of the master bias (BS), dark (DK), and flats
(FF). These master calibration frames will be used in the reduction of
the science frames. Note that the naming convention as explained in
Section ![]() is followed.
is followed.

Table: Example of a CCD reduction table
After inspecting a master calibration frame, the user may decide that a master frame is not what (s)he wants and that using another master calibration frame would be better. For example, one can specify that in the calibration process of frame susi0099.bdf the master bias susi0100_bs.bdf is to be used, i.e. the bias frames associated with the science frame susi0100.bdf. In that case the requirement is that this master bias frame can be created, i.e. that the data set susi0100 (and hence the science frame susi0100.bdf) exists and contains bias calibration frames. Using the command EDIT/TABLE, susi0099_bs.bdf can be changed to susi0100_bs.bdf, implying that the latter frame will be used as master bias frame in reducing the frame susi0099.bdf.
In addition to the standard naming convention two other input formats can be used in the CCD reduction table. The first one is the use of non-standard name(s) ( i.e. frames names that are not related to a data set), e.g. stdbias.bdf instead of susi0100_bs.bdf. In this case the system requires that the master bias stdbias.bdf already exists. A second possibility is to stored constants is the reduction table, e.g. 294 instead of susi0100_bs.bdf.
An example of the input of these three input possibilities is given in
Table ![]() . Here, for the reduction of
the frames susi0097.bdf and susi0100.bdf a constant bias
value of 295 is used while the frame susi0100.bdf will be
calibration with the default master bias. Further, for the flat fielding
the standard flat field standflat.bdf will be taken. This flat is
assumed to be present in the working directory.
. Here, for the reduction of
the frames susi0097.bdf and susi0100.bdf a constant bias
value of 295 is used while the frame susi0100.bdf will be
calibration with the default master bias. Further, for the flat fielding
the standard flat field standflat.bdf will be taken. This flat is
assumed to be present in the working directory.

Table: Example of a modified CCD reduction table
The creation of the CCD reduction table is not strictly needed. If one decides to execute only the very basic CCD commands this preparation step can be omitted.