The Flux Calibration window contains the options required for the
atmospheric extinction and flux calibration.
Click the  button in the Main window to
pop up the Flux Calibration window.
button in the Main window to
pop up the Flux Calibration window.
The  button corrects the spectra for extinction and
requires that the field Extinction table: contains a valid
extinction table name. After clicking
button corrects the spectra for extinction and
requires that the field Extinction table: contains a valid
extinction table name. After clicking  a
selection list for .bdf files
pops up. Click the file you want to correct. A small prompt window
asks for the airmass. If the airmass appears in the file header,
that value is used as default. The output is stored by default
in a file with the original name plus the suffix _ ext.
Airmass and output file name can be modified before clicking on
a
selection list for .bdf files
pops up. Click the file you want to correct. A small prompt window
asks for the airmass. If the airmass appears in the file header,
that value is used as default. The output is stored by default
in a file with the original name plus the suffix _ ext.
Airmass and output file name can be modified before clicking on
 which activates the command EXTINCTION/LONG.
The  button allows the response table to be generated.
The field Flux table: must be updated with the name of the standard
star flux table. This table can be plotted by clicking on the button
button allows the response table to be generated.
The field Flux table: must be updated with the name of the standard
star flux table. This table can be plotted by clicking on the button
 .
After clicking
.
After clicking  a file selection window appears
requesting the name of the standard star image, which must
be a one dimensional reduced, extinction corrected
spectrum. Click the name. The name of the resulting intermediate
response table is stored in the MIDAS keyword RESPTAB and
by default set to resp.tbl. Values of this table can be
interactively edited by clicking on
a file selection window appears
requesting the name of the standard star image, which must
be a one dimensional reduced, extinction corrected
spectrum. Click the name. The name of the resulting intermediate
response table is stored in the MIDAS keyword RESPTAB and
by default set to resp.tbl. Values of this table can be
interactively edited by clicking on  .
.
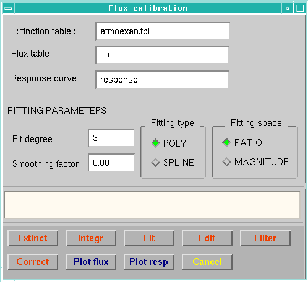
Figure: Flux Calibration window
The response table must be interpolated to generate the final response
curve, which name is provided in the field Response curve:.
The Section FITTING PARAMETERS allows the different values
and options to be selected (See Section ![]() and Chapter 6
Vol. B). The button
and Chapter 6
Vol. B). The button  radio button allows the calibration curves
to be plotted in two different ways. The first option
radio button allows the calibration curves
to be plotted in two different ways. The first option  is the standard plane used by MIDAS. The second option
  plots
plots  versus
  and generally has
the advantage to require lower order curves to fit the response.
The
and generally has
the advantage to require lower order curves to fit the response.
The  button allows fitting the
curves with either polynomials or splines.
button allows fitting the
curves with either polynomials or splines.
Clicking on  activates the MIDAS command
RESPONSE/LONG.
The response curve can also be generated by filtering
with the button
activates the MIDAS command
RESPONSE/LONG.
The response curve can also be generated by filtering
with the button  . The response curve can be plotted by
clicking on the button
. The response curve can be plotted by
clicking on the button  .
.
Reduced, extinction corrected spectra can be corrected for the
instrumental response with the button  .
Clicking on this button pops up a file selection list.
Click the name of the spectrum. A small prompt window appears
requesting the name of the output file. The
default is the input file name with the suffix _ cor.
Clicking on
.
Clicking on this button pops up a file selection list.
Click the name of the spectrum. A small prompt window appears
requesting the name of the output file. The
default is the input file name with the suffix _ cor.
Clicking on  sends a command CALIBRATE/FLUX to the
MIDAS monitor.
sends a command CALIBRATE/FLUX to the
MIDAS monitor.